
Has been a while I’m automated my house and office. Recently I’ve bumped into Home-Assistant which blew my mind away! There are thousands of components available for install. one of it is Dyson fan, which is running on MQTT protocol.
The result was cool, You can now automate it to function accordingly to your lifestyle. E.g. turned it on when you sit on your working desk or turned it off the next minute after you walk away from your desk and etc.
How far can it go? is it limit by your imagination.
Let’s build one!
The components I used as below
- Home Assistant installed, preferably with the latest firmware. In my case, I install on Raspberry Pi 3 (Getting started with Home Assistant on Raspberry Pi 3)
- Dyson Pure Cool Link
- Apache Server running on the same box as Home Assistant but on port 8088
- Fibaro Home Center 2 (Optional, you can use another brand of the gateway)
- Fibaro Motion Sensor (Optional, you can use another brand of the motion sensor)
Setting up the Home Assistant
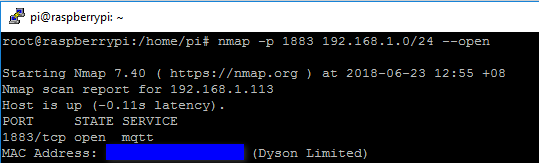
- We start by retrieving the IP of the fan using nmap from the raspberry pi. In my case, the IP is 192.168.1.113 and 192.168.1.115
nmap -p 1883 192.168.1.0/24 --open
- To enable the component in Home Assistant
sudo nano /home/homeassistant/.homeassistant/configuration.yaml

# Add the following line in configuration.yaml
dyson:
 username: your@email.com
 password: password4DysonLogin
 language: GB
 devices:
 - device_id: NM5-XX-HHHHHHHH
 device_ip: 192.168.1.113
 - device_id: NM5-ZZ-HHHHHHHH
 device_ip: 192.168.1.119
- Save the configuration.yaml and restart Home Assistant.
sudo systemctl restart home-assistant@homeassistant && sudo journalctl -f -u home-assistant@homeassistant
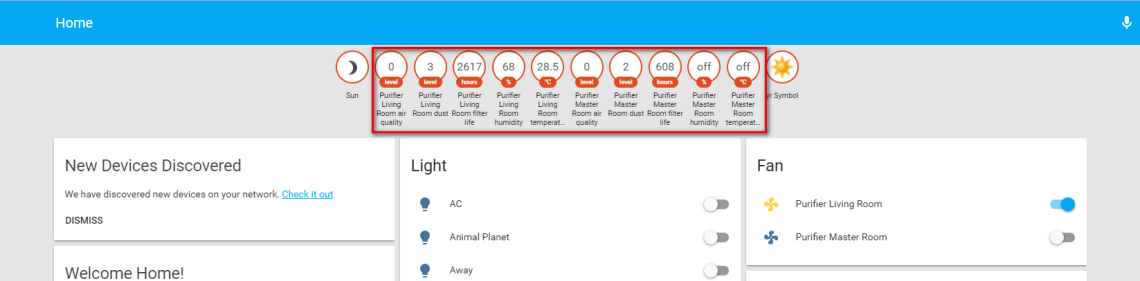
- Access your Home Assistant http://home-asistant-ip:8123. You should be able to see the following group after successfully restart (Please check your username and password if device not show). In my case, I have 2 fans.
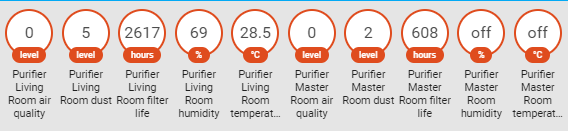
 One of the cool things is, now you can see the following details of your fan without the need to login to Dyson application
- Group all Dyson fan together. As you can see, the dashboard is quite messy. I would prefer to move all Dyson Fan related details to a new group.
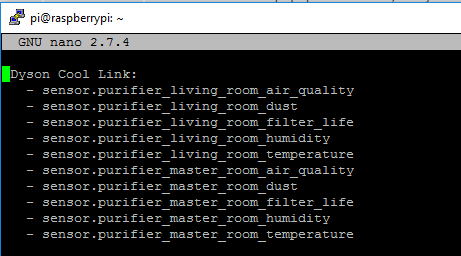
 First, click the state icon, and scroll down to locate for all sensor.purifier.* entities.
 Edit groups.yaml file
nano /home/homeassistant/.homeassistant/groups.yaml
Insert the entities into the file and restart Home Assistant service
sudo systemctl restart home-assistant@homeassistant && sudo journalctl -f -u home-assistant@homeassistant
Cleaner view and better information display

You also can locate the history of your room information base on the timeline, I find it quite cool!

Test the system
Great! the show is just about to begin, you might be curious how to toggle other function e.g. speed and oscillation.

To set the fan speed you can either do it from Home Assistant’s States menu
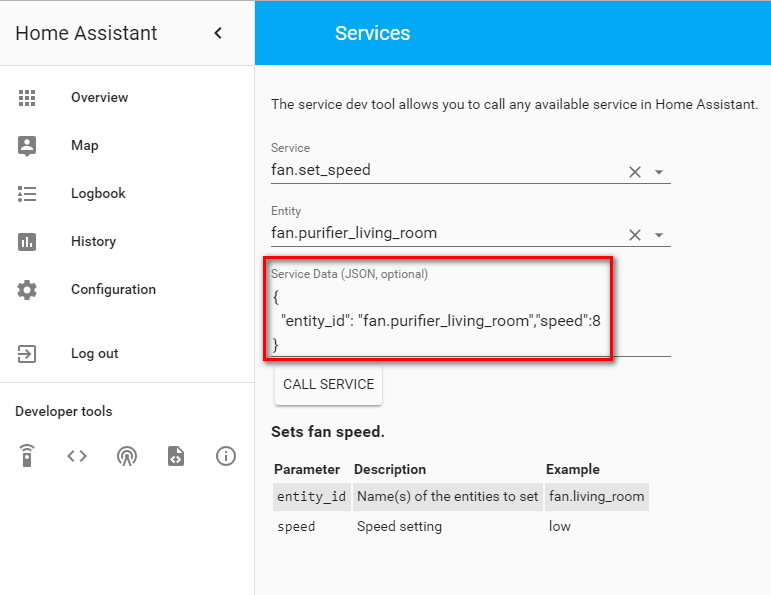
or by using curl,
Note: you need to replace all “purifier_living_room“ to your own fan name which can be found from the Home Assistant’s States tab.
curl -X POST -H "x-ha-access: " -H "Content-Type: application/json" -d '{"entity_id": "fan.purifier_living_room","speed":8}' http://localhost:8123/api/services/fan/set_speed
Set oscillation
Set oscillation true
curl -X POST -H "x-ha-access: " -H "Content-Type: application/json" -d '{"entity_id": "fan.purifier_living_room","oscillating":true}' http://localhost:8123/api/services/fan/oscillate
Set oscillation false
curl -X POST -H "x-ha-access: " -H "Content-Type: application/json" -d '{"entity_id": "fan.purifier_living_room","oscillating":false}' http://localhost:8123/api/services/fan/oscillate
Turn on/off the fan
Turn on
curl -X POST -H "x-ha-access: " -H "Content-Type: application/json" -d '{"entity_id": "fan.purifier_living_room"}' http://localhost:8123/api/services/fan/turn_on
Turn off
curl -X POST -H "x-ha-access: " -H "Content-Type: application/json" -d '{"entity_id": "fan.purifier_living_room"}' http://localhost:8123/api/services/fan/turn_off
Setup Apache server
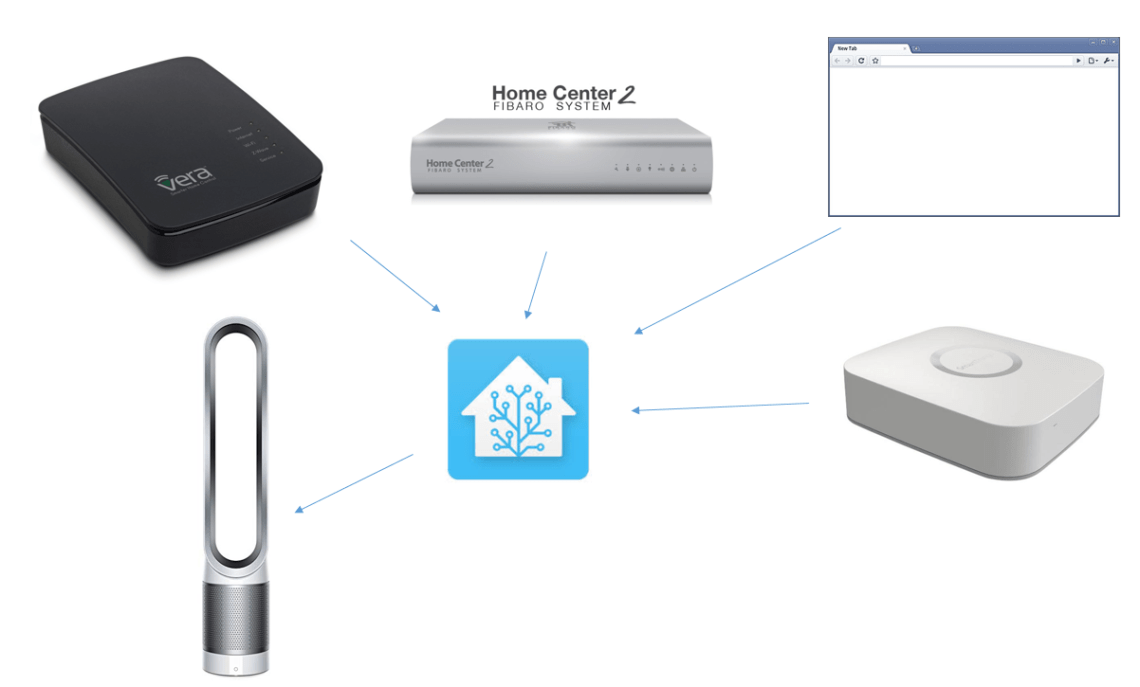
The architecture of the whole setup is to allow any other services which can do HTTP call to have access to the fan (locally only, I don’t open this to the internet).
You also can create a scene e.g. turn on the fan, set speed and set the oscillation in one HTTP call. I will share how I achieve this in later part.
- To setup Apache server in Raspberry Pi, you can refer to this tutorial by Ste Wright.
- Change default apache port from 80 to 8080, the reason is that I installed HA Bridge in the same box and it occupied port 80.
sudo nano /etc/apache2/ports.conf
change the Listen from 80 to 8080

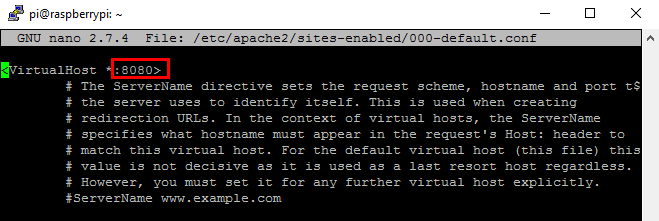
Next, we need to edit 000-default.conf
nano /etc/apache2/sites-enabled/000-default.conf
change port 80 to 8080, then save and exit.
Reload apache service
sudo /etc/init.d/apache2 reload
- Create an actions.php file to allow HTTP call.
sudo nano /var/www/html/actions.php
Copy and paste the content line by line the into actions.php file.
<html>
<?php
$action=escapeshellarg($_GET['action']);
echo $action;
$cmd = 'sudo bash /var/scripts/actions.sh ' . $action;
echo $cmd;
$output = shell_exec($cmd);
?>
</html>
- Give permission to shell_exec sudo permission
sudo nano /etc/sudoers
#add below line to the endo of the file
www-data ALL=(ALL)NOPASSWD:ALL
- Create a script actions.sh
sudo mkdir /var/scripts/
sudo nano /var/scripts/actions.sh
- Copy and paste line by line from below script into actions.sh
Note: you need to replace all “purifier_living_room“ to your own fan name which can be found from the Home Assistant’s States tab.#!/bin/bash if [ "$1" == "lfanon" ] then echo "Turning living room fan on, set speed 8 and oscillate = true" curl -X POST -H "x-ha-access: " -H "Content-Type: application/json" -d '{"entity_id": "fan.purifier_living_room"}' http://localhost:8123/api/services/fan/turn_on sleep 0.5 curl -X POST -H "x-ha-access: " -H "Content-Type: application/json" -d '{"entity_id": "fan.purifier_living_room","speed":8}' http://localhost:8123/api/services/fan/set_speed sleep 0.5 curl -X POST -H "x-ha-access: " -H "Content-Type: application/json" -d '{"entity_id": "fan.purifier_living_room","oscillating":true}' http://localhost:8123/api/services/fan/oscillate elif [ $1 == "lfanoff" ] echo "Turning living room fan off" curl -X POST -H "x-ha-access: " -H "Content-Type: application/json" -d '{"entity_id": "fan.purifier_living_room"}' http://localhost:8123/api/services/fan/turn_off fi - You need to give executable permission to actions.sh. Because I run this on my local only so I give the following permissions. Please give the script better restriction according to your environment.
chmod 777 /var/scripts/actions.sh
- Test the web call from any web browser within the same network.
The “lfanon” value will trigger the following actions.
a. Turn on the fan
b. Set speed 8
c. Set oscillate = truehttp://home-assistant-ip:8080/actions.php?message=lfanon or http://home-assistant-ip:8080/actions.php?message=lfanoff
Integration with Fibaro Home Center 2
Here comes the exciting part, I will show you how to create a virtual device and a scene to turn on the fan when motion detected and a scene to stop the fan after 2 minutes ( you can adjust according to your preference) after no more motion.
- Create a virtual device show as below
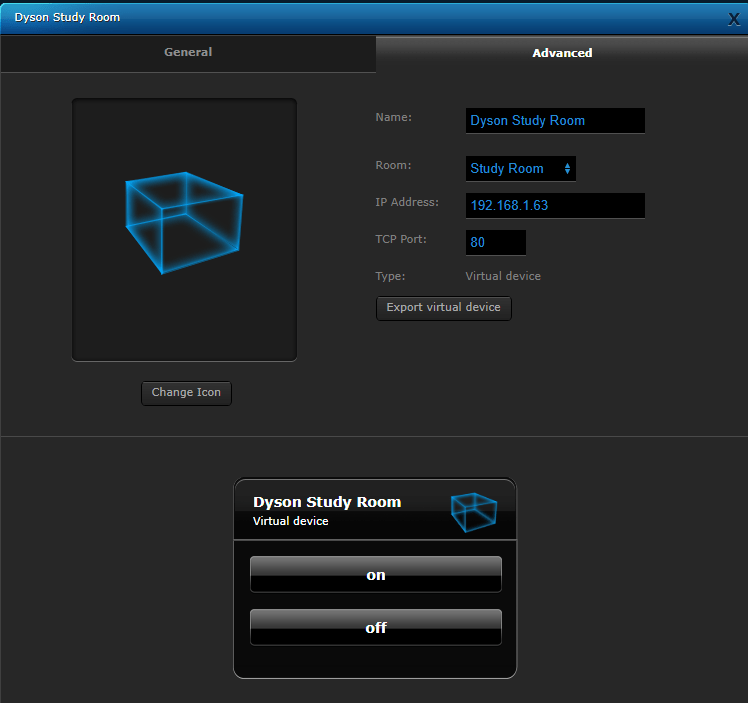
- Insert below script for the 2 buttons, IP = IP address of your Home Assistant

- Turn on fan scene
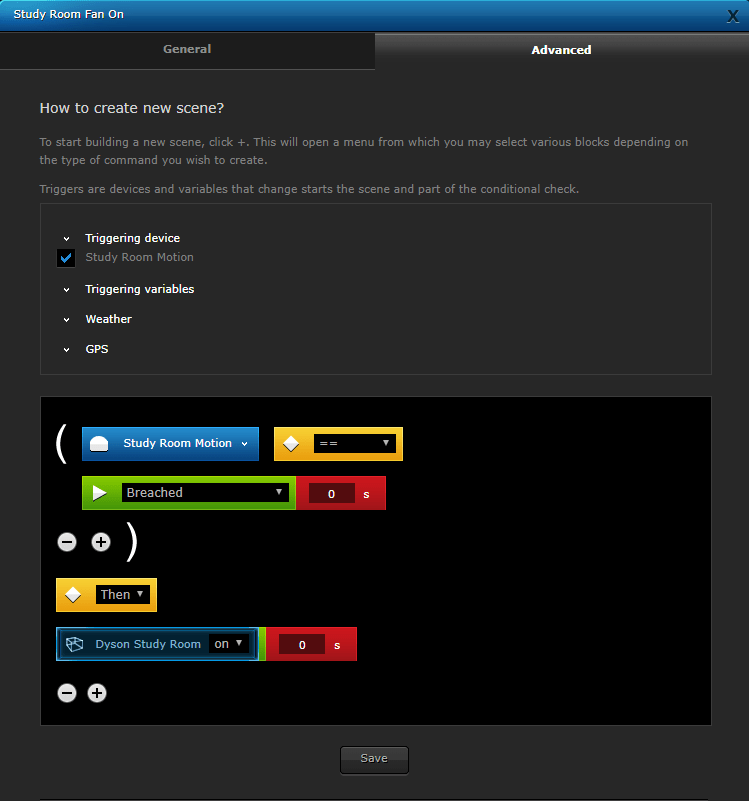
- Turn of fan scene
 That it! Let’s see the end result at below video.

Is it possible to do this simply with Fibaro ONLY?
LikeLike
I’m afraid not at the moment. another way is to learn IR command using RM Pro mini. The result not so effective compared to using Home Assistant
LikeLike
Any possibility to leverage iPhone beacon instead of motion sensor? All I want is to have it turned off once I left the machine to another room.
LikeLike
I’m not sure how iPhone beacon works, yes you can replace motion sensors with iPhone beacon, if it allows you to customize and trigger the URL.
LikeLike
Hi,
I have tried to do this implementation but I am running into issues with the curl commands.
I am using a raspberry pi 4 on which I installed home assistant 0.117.5
I have a Dyson air purifiar DP04
I am able to control it from the web interface but I need to be able to use the curl commands and I have an authentification problem.
i@raspberrypi:/home/homeassistant/.homeassistant $ curl -X POST -H “x-ha-access: ” -H “Content-Type: application/json” -d ‘{“entity_id”: “fan.living_room”}’ http://192.168.1.5:8123/api/services/fan/turn_on
401: Unauthorized
2020-11-10 12:03:48 WARNING (MainThread) [homeassistant.components.http.ban] Login attempt or request with invalid authentication from 192.168.1.5 (192.168.1.5) (curl/7.64.0)
I read about the changes with home assistant and I have added the trusted network in configuration yaml but I still get the same error
homeassistant:
auth_providers:
– type: trusted_networks
trusted_networks:
– 192.168.1.0/24
– 127.0.0.1
– ::1
Could you please help me
LikeLike
Hi Kerekes,
To solve this, simply generate a Long-Lived Access Tokens. Then replace below TOKEN with your Long-Lived Access Token
curl -X POST -H “Authorization: Bearer TOKEN” -H “Content-Type: application/json” -d ‘{“entity_id”: “fan.living_room”}’ http://192.168.1.5:8123/api/services/fan/turn_on
To generate Long-Lived Access Token, please refer to this website
https://community.home-assistant.io/t/hass-nfc-control-home-assistant-with-nfc-tags/54227/161
Best Regards,
Kheng Soon
LikeLike
Thank you very much, that worked
LikeLiked by 1 person
Hi , I am sorry to ask again but the webcall does not work
I made the actions.php and actions.sh exactly as described , the curl commands from the command line do work but the webcall does not , I have no php knowledge so I am sorry for the stupid question I just really would like to have this work
LikeLike
Hi Kinga,
May I know what is the error message you received?
Best regards,
Kheng Soon
LikeLike
Hi,
When I do http://192.168.1.8:8081/actions.php?message=lfanon , I have 8081 installed and configured for apach
It displays this :
/dev/null 2>/dev/nul$ echo “Action triggered $message Done” ?–> as if it does not recognize php
Here are my two files:
actions.php
/dev/null 2>/dev/nul$
echo “Action triggered $message Done”
?–>
and in /var/scripts/actions.sh
/dev/null 2>/dev/nul$
echo “Action triggered $message Done”
?–>
if [ “$1” == “lfanon” ]
then
echo “Turning living room fan on”
curl -X POST -H “x-ha-access: ” -H “Content-Type: application/json” -d ‘{“entity_id”: “fan.living_room”}’ http://192.168.1.8:8123/api/services/fan/turn_on -H ‘Authorization: Bearer eyJ0eXAiOiJKV1QiLCJhbGciOiJIUzI1NiJ9.eyJpc3MiOiJiODEzYzFlZDU0NmY0NTBlYWRiZmQxODk0NmFkMzk0ZCIsImlhdCI6MTYwNTAwNzk4MywiZXhwIjoxOTIwMzY3OTgzfQ.Mo5-Va-FJ-uuZF5FTnrz8xyrsscyCWJR4F8_4RVxlvg’
elif [ $1 == “lfanoff” ]
echo “Turning living room fan off”
curl -X POST -H “x-ha-access: ” -H “Content-Type: application/json” -d ‘{“entity_id”: “fan.living_room”}’ http://192.168.1.8:8123/api/services/fan/turn_off -H ‘Authorization: Bearer eyJ0eXAiOiJKV1QiLCJhbGciOiJIUzI1NiJ9.eyJpc3MiOiJiODEzYzFlZDU0NmY0NTBlYWRiZmQxODk0NmFkMzk0ZCIsImlhdCI6MTYwNTAwNzk4MywiZXhwIjoxOTIwMzY3OTgzfQ.Mo5-Va-FJ-uuZF5FTnrz8xyrsscyCWJR4F8_4RVxlvg’
fi
I was able to make it like this:
actions.php:
and for the moment test.sh contains just the turn on command
curl -X POST -H “x-ha-access: ” -H “Content-Type: application/json” -d ‘{“entity_id”: “fan.living_room”}’ http://192.168.1.8:8123/api/services/fan/turn_on -H ‘Authorization: Bearer eyJ0eXAiOiJKV1QiLCJhbGciOiJIUzI1NiJ9.eyJpc3MiOiJiODEzYzFlZDU0NmY0NTBlYWRiZmQxODk0NmFkMzk0ZCIsImlhdCI6MTYwNTAwNzk4MywiZXhwIjoxOTIwMzY3OTgzfQ.Mo5-Va-FJ-uuZF5FTnrz8xyrsscyCWJR4F8_4RVxlvg’
also I had to include www-data in sudousers
This does turn on the fan but I would like to make it like you did based on the message lfanon and lfanoff
I apreciate your help!
LikeLike
Hi Kerekes, do you have php installed? if not you may follow this website https://www.raspberrypi.org/documentation/remote-access/web-server/apache.md to install the PHP and give it a try again.
LikeLike